Setup a basic arena
Enemies spawn immediately when activated. You must deactivate the enemies before exporting the level, otherwise they will spawn immediately when the room loads, which in most cases, is not what you want.
You can also intentionally leave enemies activated. For example, P-2 does this with idols, which are always present and don't have a spawn effect.
Setup your hierarchy to look something like this

Create as many waves as you want in Stuff and add the Activate Next Wave component on all of them.
Place non movable/ non interactable stuff such as room geometry into Non Stuff.
Place your enemies and put them in the wave you want them to be in. Then disable the enemies, because due to the first note in the page
(excluding StatueFake and MannequinPoserWithEnemy Gameobjects
), set the wave count of that wave's Activate Next Wave to however many enemies there are in the wave. (Note: Some enemies like
V2 and Puppets for some reason dont count as enemies, however you
can make them spawn like normal, just dont include them in the enemy count)
In the Trigger, assign the doors of your room to the Doors tab. This will automatically lock them when the trigger is passed. Then, assign the first wave's enemies to the Enemies tab.

If you wanna see your triggers and what's behind them, set the material of your cube to Enemy trigger material, just be sure to set the gameobject's layer to Invisible
To quickly add enemies to the Next Enemies and Enemies tab, click on your current wave and hit the lock button in the inspector window. You can now select multiple enemies at once and drag them on top of the list (Note: Drag them on the Next Enemies header, not the size one!)
For every wave until the last, set the Next Enemies tab of the Activate Next Wave to the next wave's enemies (Note: For StatueFake, enable their activator which is a child of them, dont put the StatueFake itself), and dont forget to also set the enemy count!

When you reach the last wave, leave the Next Enemies tab blank, and set the Doors tab with the doors you set previously on your Trigger. This will automatically unlock them when the last wave's enemies are killed.

Advanced Arenas
This was taken from the Tundra Level Editor wiki.
Sometimes, you want multiple arenas in the same room. Perhaps you're creating a non-linear level, and want a different encounter on the return trip. In such cases, ArenaStatus will help.
In this example, we're going to have two encounters in the same room: one on first entering the room, and another activated by a condition.
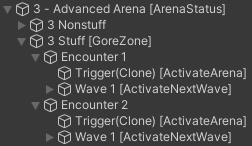
Create a hierarchy like the following:
3 - Advanced Arena 3 Nonstuff Your level geometry and lights will go here... 3 Stuff (this should have a GoreZone on it) Encounter 1 Encounter 2 Create both encounters using the Manual Setup detailed above.
Encounter 1 will run normally on entering the room, and doesn't need any further changes.
To create an alternative encounter that activates on a condition, first add an ArenaStatus component to the top-level Room Object, 3 - Advanced Arena in this case.
Open Encounter 2's Start Trigger and set Wait For Status to 1.
Now, create something that will change the ArenaStatus. Skull Pedestals have a Arena Statuses field, which is what is used in the example.
And... that's it! Now encounter 1 should run when first entering the room, and then encounter 2 should run upon returning to the room after triggering something (e.g. a skull placement).
You should have a hierarchy like the following -